I frequently tell my students that I have learned more about music by transcribing it than any book could ever have revealed to me. When I was a young, inexperienced newcomer to jazz, I wanted desperately to learn more about improvisation. My teachers advised me to transcribe solos, and so I did, and they were right! I can still remember note for note my very first solo transcription—Miles Davis’ on “When Lights Are Low.”
Now, with more than 40 years of classroom teaching experience, I try to inspire my students using the same advice—transcribe! I know the challenges involved (transcribing is hard!) but I also know the rewards are well worth the effort.
In this post, I’d like to share some transcription tips from my new book, Reading, Writing and Rhythmetic: the ABCs of Music Transcription. It offers a simple formula you can use:
Listening (ear training) + Analysis (brain training) = Successful Transcription
Internalizing the music is the ultimate goal—that’s why listening is the most important step in the transcription process. If you can’t remember the music, there’s nothing to translate. Starting with the familiar is a good place to begin.
Starting with the Familiar
Have your students start with a familiar song from memory, such as “Happy Birthday.” Because they already know the song they can jump right to the second step of the transcription process—translation.
Musicians and non-musicians alike know and can sing “Happy Birthday.” But it’s the musician that can understand and analyze it.
Encourage your students to ask the following questions, as they begin to analyze “Happy Birthday.” You might have to prod them with some clues shown in the parenthesis.
![]()
- Where’s the beat? (Their body language will likely show you that they can feel it)
- What’s the time signature? (That’s right, 3/4 time, the pickup notes can make this a tricky question)
- Is “Happy Birthday” in a major or minor key? (Let’s hope they know it’s major…ha-ha!)
- Where’s “do,” the root of the scale? (Usually at the end of the melody)
- What’s the starting note? (That’s right, it’s NOT do, it’s sol)
- What are the accompanying chords? (Simple melody invites simple harmony)
Let’s Do Something Rhythmic — I Got Rhythm
When listening to a piece of music, can your students feel the beat, and express the rhythmic phrase? In most cases, yes—they got rhythm. But what is often their biggest challenge is notating rhythms. We can reference an instrument for the pitches, but what can we reference for rhythmic notation?
We can use the traditional tools of counting and conducting. ![]()
Let’s not underestimate the value of the two-way street of reading and writing, and how reading can be the example for recognizing similar rhythmic phrases when listening and transcribing.
However, let me suggest another possible approach— memorizing short “rhythm words.”
Here’s a good analogy with the English language. When looking at the word “t-h-e,” what do you see? Do you spell out the letters “t-h-e” or do you immediately react to these letters, recognizing them as the word “the”?
Spelling out the letters of words is similar to counting, “1+2+…” through a rhythmic phrase. Let’s develop a spelling list of short “rhythm words,” and begin to commit these “words” to memory. Have your students workout with the following two-beat “rhythm words.” How?
![]()
First, make sure your students can read and perform them with accuracy. Then pair students into groups of two, with one student performing the rhythm word as their partner identifies the phrase, and then have them switch roles. This is a fun and engaging way to get students interacting with one another. You can up the ante, expanding the practice challenge to using longer “compound rhythm words” that combine the two-beat words into various combinations.
Ready to transcribe? Using all the tools of counting, conducting and our memorized list of rhythm words, have your students transcribe the rhythm of a familiar piece. You might, for example, have them listen to Joni Mitchell’s “River,” from her Blue album and transcribe just the rhythm of the first eight bars of the piano introduction.
Melody—If You Can Sing It, You Can Hear It
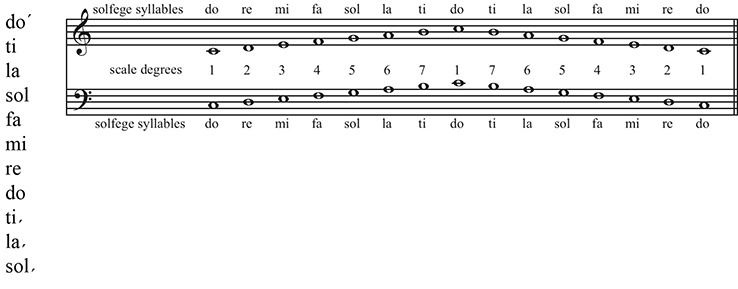
How can you help prepare your students for transcribing melodies? Singing is a great way—if you can sing it, you’ve heard it, and now you’re just one step away from notating it. Have your students start simple by singing stepwise through the major scale, using numbers or movable Do solfege syllables to describe how the diatonic pitches function within the key.
Along with viewing the scale written out in the staff (horizontal), using a “tone ladder” is a great way to visualize how diatonic pitches relate vertically to one another.
One creative way your students can practice the scale is by improvising a stepwise melody. It gives them more ownership of the process, keeps them consciously “in the moment,” and it’s fun! Encourage them to use the tone ladder as a helpful visual guide when improvising.
Your students are now warmed up for transcribing simple stepwise melodies—and there are lots of them out there! Have them focus only on the pitches, singing their answers using numbers and/or solfege syllables. We can reserve notating the melodies for another day— get them translating, singing solfege, for now. Remind them of some clues (for example, most melodies end on do of the key).
Here is a short list of stepwise melodies to get your students off to a win-win situation. They will already be familiar with a few of these songs, so they can go right to their memory bank and get started. Invite them to research the web to hear various performances—after all, it’s the music that is the motivator!
- “Joy to the World” (starts on do)
- “Lean on Me” (starts on do)
- “My Romance” (starts on mi)
- “Ode to Joy” (starts on mi)
- “Silver Bells” (starts on mi)
- “The Way You Look Tonight” (starts on sol)
When your students are ready, challenge them with more complex melodies (including minor melodies), and have them visualize the pitches on a keyboard, on their instrument, in the staff, etc. The most important steps are the early steps, so don’t overwhelm with too much information—give your students the boost of confidence they need in this tricky business of ear training.
Harmony—Knowing Theory Helps
Transcribing the chord changes of a song can be tough! Let’s use some theory tips to get your students well on their way. If they only listen to the guitarist or pianist on the recording then they could be in for a big challenge. Remind them to pay close attention to the melody— most melody notes will be chord tones. This is what I refer to as the “top-down” approach. The other “melody” to listen to is the bass line—this is where you’re likely to hear the roots of the chords. I call this the “bottom-up” approach. These two lines together can provide more than half the answers you’re looking for.
Another practical tip is to memorize common chord patterns. Though no two songs are exactly alike, many songs will share the same chord progressions— committing these popular patterns to memory will save your students a lot of time when transcribing the changes. I’ve listed a few chord patterns below, along with a song that features each pattern.
- I IV I V I (“Lean On Me,” Bill Withers)
- I V IV I (“Come Away With Me,” Norah Jones)
- I IV V I (“Mandeville,” Bill Frisell)
- I VI– IV V I (“Every Breath You Take,” The Police)
- I VI– II– V I ((“Hiding My Heart Away,” Adele)
- I V VI– IV I (“Let It Be,” The Beatles)
Transcribing Jazz Solos—The Ultimate Experience
This is the ultimate transcribing experience of all! Students need all the help they can get in organizing how they will accomplish this most challenging task.
Here are a few suggestions:
- Love the music you choose to transcribe— motivation is the fuel.
- Pick a solo that is manageable— or you might never get started.
- Spend enough time listening first—internalize the music before you notate, put that pencil down!
- Research a lead sheet for melody and chord changes—most solos draw from both.
- Use technology—using software that can loop, slow down and playback the music are extremely helpful tools!
- Don’t attempt everything in one session—refresh the brain and the ears often.
- Analyze the solo—what have you learned?
- Appreciate the music—it goes far beyond the written notes on the page.
Transcription is a wonderful, empowering experience that simultaneously deepens our appreciation of the music we study. I can still sing back Miles’ solo on “When Lights Are Low” after 40 years. I suggest you go listen to the “real deal” from the album Blue Haze. Enjoy!