According to the musical My Fair Lady, a proper lady always enunciates (articulates) with the greatest facility and clarity.
Does it really matter how we say things?
In the choral world, a large part of the musical performance relies on diction. If one singer vocalizes an “AH” while the others vocalize an “EH,” the ensemble will never blend or sound in tune. One example presented itself when our church choir was learning the old gospel tune, “Wade in the Water.” My daughter, the real singer in our family, became upset during the rehearsal. “It’s Woah-der, not Wa-ter,” she explained. As soon as the entire choir agreed on the enunciation (articulation) of the words, the rhythms fell into place, the chords lined up, intonation improved, and the gospel character of the piece was attained. The words developed additional meaning which gave our group (and our congregation) a memorable performance.
Diction in the Instrumental World
In the instrumental world, do we do that? Do we spend as much time working on the diction of our musical performance? More than just tonguing and slurring, do we alter our articulations based on dynamics, phrasing, placement in the measure, musical genre or other variables?
I spend time talking with students about how speaking with precise diction can make you sound smart (everyone wants to sound smart). I’ll write a simple sentence on the whiteboard. Then we’ll have fun saying it with different accents and articulations. We might try a proper Queen Elizabeth accent, something that sounds Australian, country, or like a surfer dude. I encourage everyone to pay close attention to the formation of their mouth, throat, tongue and air stream change for each. The takeaway here is that we’re examining something that students know how to do – to talk – and then discussing how to transfer what we observe into articulations for their instruments.
In music, the tools we use to create our unique “accent” are referred to as articulation. With any type of articulation, there are three parts: start, sustain, and release. Here are some things to consider when you approach any piece.
The Start of the Note
The start of the note occurs in that split second where we go from silence to sound. The question is; “How do we begin the sound?” Is it a soft, gentle start? Do we attack with an accent or an explosive approach? In the string world, it goes back to the bowing or plucking of the string. Often times we can tell how a note will be played because we can “see” a violinist place the bow (or fingers) over the strings prior to playing.
The same thing happens with percussionists; we can see how they use the mallet or hand to strike their instrument and where on the instrument they strike. Change the location of the strike on a drum head and you change the articulation.
With a wind instrument, our tongue becomes our valve to start the air stream. Whether single, double or triple tonguing we often use syllables: Tah, Tu, Dah, Do, Dit, Dot, Nah, Lah, Gah, Kah, Ku, Bah and so on. To accent we use a stronger initial breath. For a softer start, we may use less volume of air with high air speed – similar to “water” coming from a sink or hose. Decide what the music calls for and use that throughout your organization. Ultimately, we want a clearly defined start to each pitch.
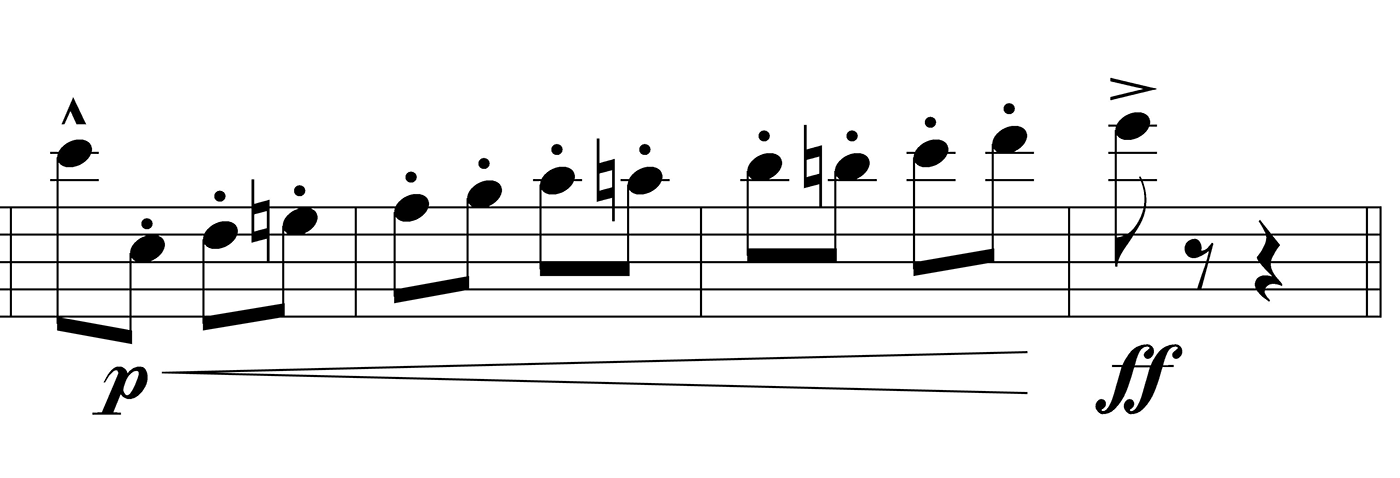
Here’s a very common rhythmic example:
Try this rhythmic example with a Tah, Tah, Tah straight 1/8th note. Next try it with Doo, Dah, DAHT with a slightly late feel on the last 1/8th note. Totally changes the statement. Depending on the “style” of music, where the rhythm is placed in the measure and the articulation marks changes the way we perform the rhythm. I’d encourage you to write syllables into parts as necessary. Having your wind players enunciate with the same syllables fixes many issues with starts, accents (written and implied), and rhythmic precision.
Sustain
“Sustain” is the middle of the note, where the note gets its character, it’s beauty, it’s meaning. This is where vocalists focus on the vowels, while string players on the movement of the bow. Percussionists may focus on the evenness of their roll and stick/mallet placement while wind players focus on the air stream and embouchure. Consistent air pressure and speed help maintain clarity of pitch, intonation, movement, dynamics, etc.
As you observe your students, take note where in their bodies they are breathing. If their notes die off quickly, try to get them to breath lower and use more diaphragm for consistency. With little kids, a finger on the belly button works quickly and easily – “push out your finger as you breathe in…” Another exercise to help make the breathing process more concrete is to have them place their hands around their abdomen area (thumbs on their backs with their hands wrapping around to tummy). As they breath in the kids should feel their hand expand.
Embouchure Vs. Air
Don’t forget, embouchure is just as important as air. Make sure students know that embouchure is more than their cheeks, chin and lips. Encourage them to experiment with the inside of their mouth to learn how it affects the color of longer tones. Have them make note of tongue placement, the state of the back of their throat, and their soft palate. A tone that is choked or strained will need the throat to open and relax – think Hot Potato. A note that is flat may be the result of a mouth that is too open for the amount of breath support the kid is able to produce. So, raising the tongue into an “Ih” or “Ee” shape may help to speed up the air stream and help stabilize the pitch center.
In my own playing, I’ll imagine swallowing to bring in more of the fundamental and darken the tone. If I’m sustaining a pitch for several measures I often change the tone as the surrounding chords change to keep the note relevant within the harmonic structure by changing the shape of my tongue and how open or closed my throat is. This is a harder concept for kids because they can’t “see” what is happening.
Remind them that it takes a quiet space to hear some of the subtle differences in the tone. Be warned – even staccato 1/16ths have a sustain portion. Otherwise, they can lose their tone and musicality. A good example of staccato for beginning kids is to emulate is a hard rubber mallet on a xylophone – “Sound like the xylo.” The hard rubber has less of a percussive attack than the acrylic or plastic mallets. Thus, allowing the kids to hear the 3 parts of the note more clearly. Have the students listen carefully to the resonance in the short sustain and the quick decay into the release.
Release
The release is the ending of the note. In deciding how any note should stop, keep in mind the style of the music being performed. Just as with the attack of the note, the release can be soft, accented, tapered, etc. I tend toward an “open” ending to each tone using the release to set up the next note/rest.
When I’m playing a walking tuba part, I often say, “Toe.” “T” is the start. “O” is the short sustain. “Ooo” is the release. I want to emulate a tapered decay of the pizzicato string bass. I don’t stop the air with my tongue – I just stop blowing. Likewise, in legato playing the end of one note is the beginning of the next.
When all 3 parts of a group’s articulations are done correctly the musical effect can be astounding. In 1989, I heard one of the most phenomenal release effects of my musical life. A local marching band started their show facing backfield. They did an opening move that expanded the shape while playing basic block chords intertwined with moving eighth note passages. The last chord had a very slight crescendo, then an abrupt release. During the release, the band did a silent 4 count turn to the stands – creating an echo effect during the silence. Then, the most gloriously powerful sound I’ve ever heard came off that field. WOW, just WOW. Audience members fell out of their seats. No, they really did fall out of their seats.
The kids used the clean release to help set their embouchures and wind streams, produced a consistent TAH to start the tone and a full resonant sustain to produce a magnificent wall of sound.
Parting Thoughts
- Like talking, music must communicate with your audience
- If you have an intonation problem, consider the air stream and embouchure formation
- Teach rhythm through articulations
- Have the ensemble speak the articulations while fingering
- Don’t forget that “fingers” articulate as well
- Make sure releases have purpose
- Articulations need to be consistent throughout the ensemble
- Silence is just as big a part of the articulation equation as sound
- If performing an instrumental piece that was written with words, use that text to inform and shape your articulations
- This will cause some debate – Is it ok for your “tongue” to touch your lips?
- As a tubist, sometimes the lower register speaks better with a slight touch to the lips
- Smaller instruments – no – keep it above the teeth
We need to take just as much care with articulations and singers do with diction. Define then refine the articulations within each piece. Taking the time to work through articulations will make for a better ensemble and thus, better music. Remember to mentally “hear” what you want before you try to produce it. Once “said,” you can’t take it back!